OPERATING INSTRUCTION

1. After the grinding process is over, it is time for cleaning, usually there is no need for, cleaning of Flour-mill but for those who want 100% cleanliness, you can clean sticky flour from grinding, chamber with help of Cleaning brush and Cotton cloth.

2. The Flour-mill is made with Auto Clean technology so it should start for 2 minutes even, after the grinding process is over. So it confirms that remaining grains in grinding chamber gets grind, completely.

IMPORTANT TIPS

1. For Cleaning the chamber, slide the container into its proper place and clean the chamber with a brush so that the residual flour falls in the container and not in the cabinet.

2. Cut turmeric, ganthoda and dry ginger into peanut sized pieces and only then pour them in the hopper for grinding.

3. Ensure that the sieve is set in its proper slot. If the sieve is blocked, wash it in hot water with a brush.

4. Proper electrical wiring with proper earthing is must for operating Flourmill, IRL so that there are no chances of leak of electricity.

INCLUDED ACCESSORIES

महत्त्पूर्ण सूचनाए

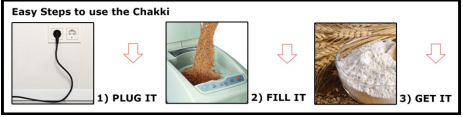
1. अनाज होपर के अंदर डालिए। Autoclean के मोडेल में Auto ON सिस्टम होने की वजह से अनाज डालते ही चक्की चालु हो जाती है।

2. दिये हुए फिल्टर को बर्तन पर बहोत अच्छी तरह से लगाए। दरवाजा धीरे से धकेलकर बंध कीजिए। जिससे वह ऑटो लॉक हो जाएगा। (यदि दरवाजा बंध नही होगा तो चक्की चालू नही होगी)

3. आटाचक्की अपने आप ही अनाज के मुताबिक सेटिंग्स कर लेगी और अनाज पीस जाने के बाद औटोमेटिक बंध भी हो जायेगी।

4. अनाज पीस जाने के बाद बर्तन से आटा निकाल ले, उसके बाद ही दुबारा अनाज पींसे।

5. चेम्बर की संपूर्ण सफाई के लिए बर्तन को आटाचक्की मे दिये गया कपडा जो ग्रायडिंग चेम्बर को कंटेनर से जोडता हे उसको पहले थोडा साफ करने के बाद ही उसे निकाले ।

6. हल्दी, सोंठ, लाल मिर्च को पिसते समय छोटे-छोटे टुकड़े करके ही होपर में डाले।
 

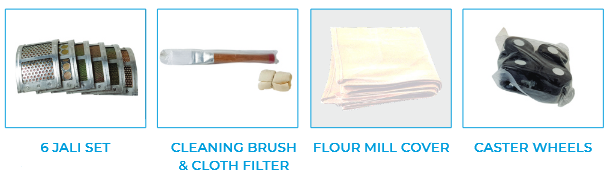
7. छलनी उसके लिए खास बनाई हुई जगह में ही डाले और जाँच लें की छलनी ठीक से लगी है।

8. छलनी आटे से जम गयी हो तो गर्म पानी मे धोकर ब्रश से साफ करे।

9. आटाचक्की को चलाने के लिए पक्के अर्थिग का होना आवश्यक है वरना शोक लग सकता है।

Main Menu